how-to-create-a-resume-template-in-word
Resume Layouts: How To Create A Resume Template In Word
Every recruiter has been there, staring at a raw CV that needs to look polished and professional before it hits a client's desk. Knowing how to create a resume template in Word gives you a repeatable...
Written by: Saply Team

Resume Layouts: How To Create A Resume Template In Word
Every recruiter has been there, staring at a raw CV that needs to look polished and professional before it hits a client’s desk. Knowing how to create a resume template in Word gives you a repeatable starting point, so you’re not reformatting from scratch every single time. Whether you’re pulling from Word’s built-in options or building a custom layout that matches your agency’s branding, a solid template saves real hours across a busy week.
This guide walks you through both approaches step by step. You’ll learn how to access and customize Word’s preloaded resume templates, and how to design your own from a blank document, with proper sections, consistent formatting, and a layout that reads well on screen and in print. We also cover tips for saving your template so it’s ready to reuse across candidates and roles.
Of course, if you’re a staffing agency handling dozens (or hundreds) of CVs per week, manual template work adds up fast. That’s exactly why we built Saply, it plugs directly into Word, Google Docs, and your ATS to format and tailor CVs automatically, so your team spends less time on layout and more time placing candidates. But whether you use a tool like Saply or prefer the hands-on route, a well-built Word template is a skill worth having. Let’s get into it.
What to decide before you build your template
Before you open Word and start dragging text boxes around, take five minutes to answer a few key questions. Rushing into the build without a plan leads to inconsistent formatting, sections that don’t resize cleanly, and a template you’ll need to rework every time you use it. The decisions you make upfront determine whether your finished template actually saves time or just adds a new layer of manual cleanup.
Pick your column layout
Single-column and two-column layouts each have real trade-offs, and the right choice depends on how your clients review CVs and what your agency’s branding looks like. A single-column layout is the safer pick for ATS compatibility, since many applicant tracking systems read content left to right in a single pass and can scramble text pulled from multi-column table cells. If your CVs go directly to human reviewers, a two-column design can pack more information into a tighter space and look more visually structured.
If your CVs pass through any ATS before reaching a client, default to a single-column layout to avoid parsing errors that strip or reorder content.
For most staffing agencies, a clean single-column format with clear section headers is the most reliable baseline. It prints well, reads cleanly on screen, and gives you the most flexibility when you’re swapping in candidate content across different roles and clients.
Decide which sections to include
The section structure of your template should reflect the types of roles you fill, not just a generic list of resume sections. A template built for tech placements might prioritize a skills block and project history near the top. A template for executive search looks different: it leads with a professional summary and career highlights, with education pushed toward the bottom.
List out the sections your agency uses most consistently before you start building. A solid starting point for general-purpose templates includes:
- Contact information
- Professional summary
- Core skills or competencies
- Work experience
- Education and certifications
- Additional sections (languages, publications, volunteer work)
Knowing your sections in advance lets you build labeled placeholder blocks for each one, which is exactly what makes a template genuinely reusable. When you understand how to create a resume template in Word at this planning level, you stop rebuilding the structure every time and start filling in content instead.
Lock in your fonts and spacing rules
Consistent typography is what separates a polished CV from a document that looks assembled in a hurry. Decide on your heading font, body font, and size hierarchy before you touch a single Style in Word. A clean and widely readable pairing is Calibri or Garamond for body text at 10 to 11pt, with section headers set slightly larger or bolded for visual separation.
Spacing rules carry just as much weight. Set your line spacing (1.15 or 1.5 works well for readability), your margin widths (0.75 to 1 inch on all sides is the standard range), and your paragraph spacing before and after headers. Locking these in before you start building means you apply them once through Word’s Styles panel, rather than manually adjusting every paragraph block later. Fixing formatting inconsistencies after the fact is one of the most time-consuming parts of working with CVs at volume, and it’s entirely avoidable if you define the rules before the first section goes on the page.
Step 1. Start from a Word template or a blank file
You have two starting points when learning how to create a resume template in Word: use one of Word’s built-in resume layouts as a base, or open a blank document and build the structure from scratch. Both paths lead to the same result, but they suit different situations. Built-in templates save setup time and hand you a working layout immediately. A blank file gives you full control over every element, which matters when you need to match specific agency branding or a client’s preferred format.
Use Word’s built-in resume templates
Word ships with several preloaded resume layouts that cover the most common formats. They’re a reliable starting point if you want a working foundation to modify rather than something you’ll rebuild from zero. To access them:
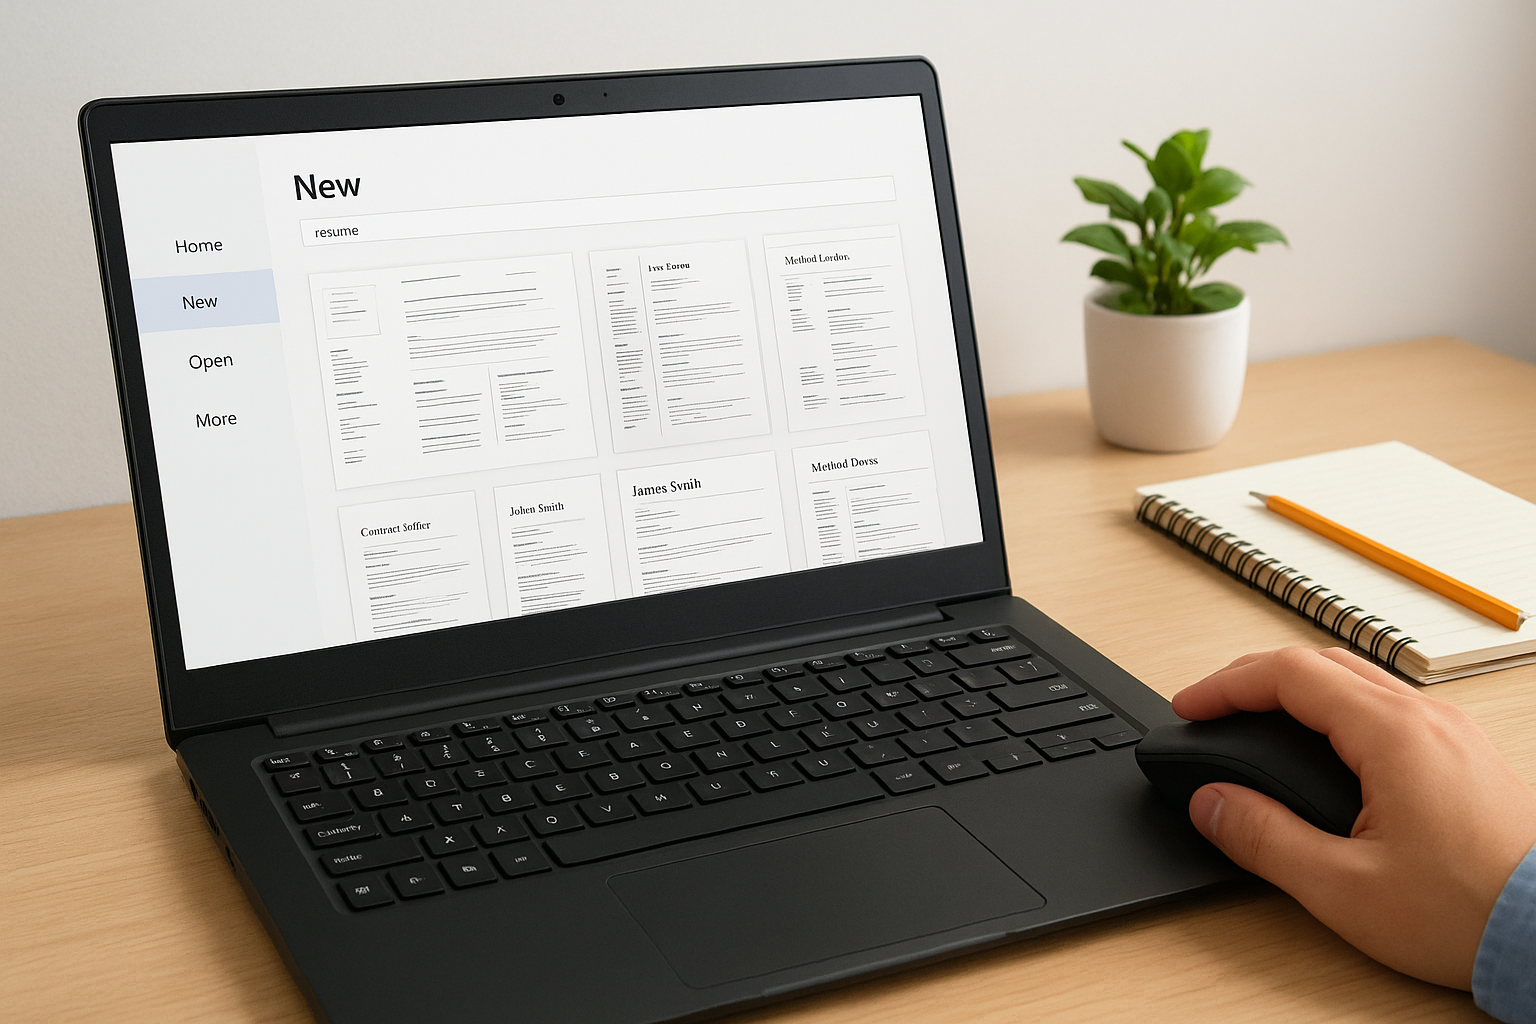
- Open Microsoft Word and click File > New.
- Type “resume” into the search bar at the top of the template gallery.
- Browse the results and select a layout that fits your target structure (single-column for ATS submissions, two-column for client-facing presentations).
- Click Create to open a working copy.
- Replace placeholder text with your standard section headers and sample content blocks.
- Delete any sections your agency doesn’t use and add any that are missing.
Save your version immediately with File > Save As under a new name, so Word’s default template stays untouched and available for future reference.
Once the file is open, treat it as raw material, not a finished product. Adjust fonts, spacing, and color to match your agency’s standards before anything else, so every candidate CV you produce from this base looks consistent.
Start from a blank document
A blank file takes more effort upfront, but it eliminates any inherited formatting quirks that come bundled with preloaded templates. Open Word, select Blank Document, then go to Layout > Margins > Custom Margins and set all four sides to 0.75 or 1 inch before you type a single word.
From there, type your section header placeholders in sequence: Contact Information, Professional Summary, Core Skills, Work Experience, Education. These labels form your structural skeleton. You’ll apply consistent font styles and spacing to each one in the next step, so focus entirely on getting the right sections in the right order before worrying about how anything looks.
Step 2. Build the layout with styles, tabs, and tables
With your sections in place, the next priority is making them visually consistent and structurally sound. This is where most people go wrong when figuring out how to create a resume template in Word: they format each element manually, one paragraph at a time. That approach breaks down the moment you need to reuse the template across candidates. Use Word’s built-in Styles, tab stops, and table features instead, and you’ll apply formatting rules across the entire document in seconds rather than minutes.
Apply Word Styles to your section headers
Word Styles let you define the font, size, color, and spacing for a text type once, then apply it globally with a single click. Open the Home tab, find the Styles panel on the right side of the ribbon, and right-click “Heading 1” to select “Modify.” Set your chosen font, size, and color to match your agency’s standards. Do the same for “Heading 2” if you use subheadings within sections, and for “Normal” to control your body text.
Once you modify a Style, every instance of that Style in the document updates automatically, which makes bulk formatting changes take seconds instead of requiring you to hunt through every paragraph.
Apply your modified Heading 1 Style to each section label (Professional Summary, Work Experience, Education, etc.) and your Normal Style to all body copy. The result is a fully consistent document where every section header looks identical without any manual adjustment.
Use tabs and tables to align content
Tab stops handle the alignment of right-side content like dates and locations without using the space bar, which shifts unpredictably across different screens and printers. Highlight a work experience line, go to Format > Tabs, and set a right-aligned tab stop at 6.5 inches. Now pressing Tab after a company name pushes the date to the far right of the same line, cleanly and reliably.
For two-column content blocks like a skills grid, insert a borderless table instead of using columns or text boxes. Go to Insert > Table, choose your column count, add your content, then select the entire table and set all borders to “No Border” under Table Design. The layout holds together, resizes cleanly, and stays readable by most ATS parsers, unlike text box columns which frequently cause content to drop or reorder.
Step 3. Save it as a reusable resume template
Once your layout is formatted and your Styles are locked in, the last structural step is making sure the file saves correctly so you can pull it up again without accidentally overwriting it. Most people save their template as a regular .docx file, which means every time they open it for a new candidate, they risk editing the master version. The right approach is to save your work as a Word Template file (.dotx), which opens as a fresh copy each time rather than editing the original.
Save your file as a .dotx template
Word’s template format is designed exactly for this use case. When you understand how to create a resume template in Word properly, saving in the correct format is what makes it reusable rather than just a formatted document you’ll end up duplicating manually. To save your resume as a true template:
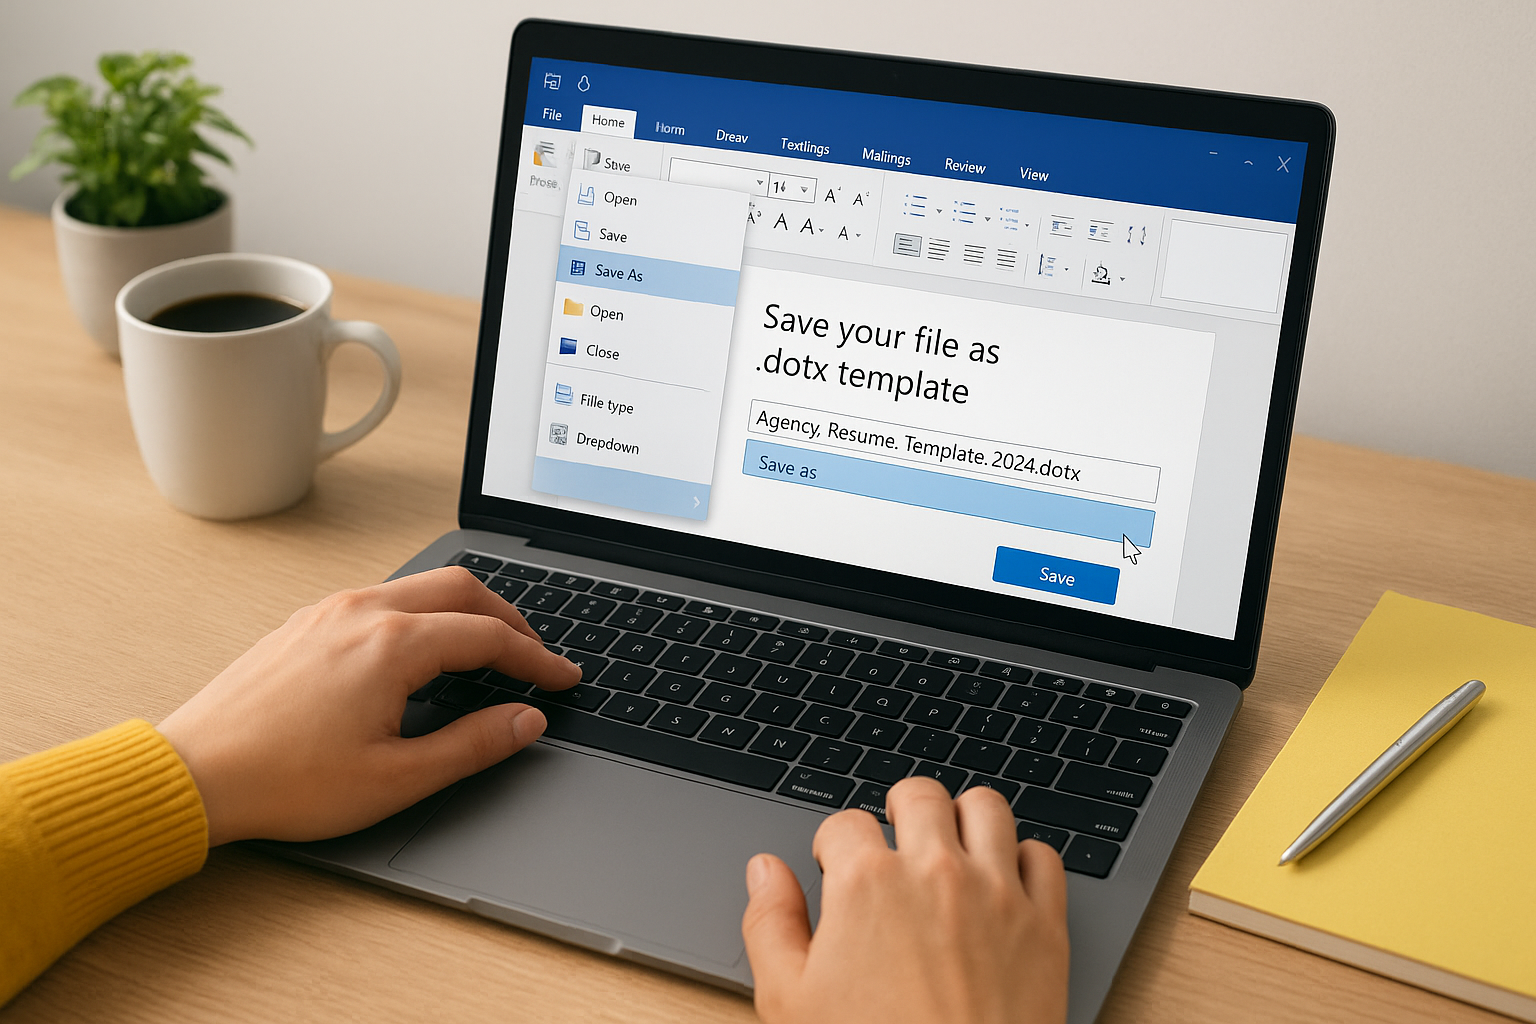
- Go to File > Save As.
- Click the file type dropdown (the field below the file name).
- Select Word Template (*.dotx) from the list.
- Name your file clearly, for example:
Agency_Resume_Template_2024.dotx. - Save it to Word’s default Custom Office Templates folder so it appears under File > New > Personal.
Saving to the Custom Office Templates folder means your template shows up directly in Word’s New Document screen, so any recruiter on your team can access it in two clicks without hunting through shared drives.
From that point forward, opening the file creates a new untitled document based on your layout, with all your Styles, margins, and placeholders intact, and leaves the original template file untouched.
Lock the template to prevent formatting drift
One recruiter editing placeholder text is fine. One recruiter accidentally deleting a Style or resizing a column is a problem you’ll notice three candidates later when the layout looks inconsistent. To prevent this, use Word’s Restrict Editing feature under the Review tab. Set it to allow only filling in forms or tracked changes, which lets your team add candidate content without touching the underlying structure.
You can also add a brief formatting guide as a comment or text box in the header area of the template. Note the font names, sizes, and spacing rules you defined in the planning stage so anyone using the template has the reference they need right there in the file.
Step 4. Make it ATS-friendly and ready to send
A template that looks great in Word but breaks inside an ATS costs you placements. Before you treat your template as finished, run through a short checklist to confirm that the formatting you built in the previous steps won’t cause a parsing system to scramble, drop, or misread candidate content. This is the last mile of knowing how to create a resume template in Word that actually works in the real world.
Remove elements that ATS systems can’t read
Most ATS platforms read documents sequentially, and several common Word formatting choices interrupt that process. Text boxes, headers and footers, and inline graphics are the most frequent offenders. Content placed inside a Word header or footer (including contact details, which many templates put there) often gets ignored entirely by parsers. Move all candidate information into the main body of the document before your template goes into regular use.
If you used a borderless table for a skills grid, verify it doesn’t span across a page break, since some ATS systems stop reading a table when it splits across pages and drop the remaining content.
Run through this checklist before you lock the template:
- No text boxes: move all content into standard paragraph blocks
- No header/footer content: keep name, email, phone, and LinkedIn in the document body
- No inline images or icons: remove decorative elements entirely
- No custom fonts: stick to system fonts like Calibri, Arial, or Times New Roman
- No tracked changes or comments: accept all changes and delete all comments before saving
Export to the right file format
Your finished template in .dotx format is for internal reuse. When you fill it out for a specific candidate and need to submit it, the output format matters. Most ATS platforms accept both .docx and PDF, but they parse .docx files more reliably than PDFs in the majority of cases. Send a Word .docx file unless a client or system specifically requests PDF.
To export a candidate-ready copy, go to File > Save As, choose Word Document (.docx) from the file type dropdown, and name the file clearly (for example: FirstName_LastName_RoleName.docx). Keep your .dotx master file untouched and archived separately so your team always has a clean version to return to.

Wrap it up and reuse it fast
Now you know how to create a resume template in Word that holds up across candidates, roles, and ATS systems. The process breaks down into four clear stages: plan your layout before you build, apply Styles and tabs for consistent formatting, save your work as a .dotx file so it stays reusable, and strip out anything that confuses a parser before you send.
Your template is only as useful as the time it saves you. Keep it maintained, update it when your agency’s branding changes, and train your team on where the master file lives. If you handle high volumes of CVs each week, manual formatting still adds up fast even with a clean template in place. That’s where Saply’s CV formatting and tailoring tools come in, plugging directly into Word and your ATS to handle the layout work automatically so your team can focus on placing candidates.